Friday, October 31, 2014

Free Motion Friday: Falling


Alright, time for the quilting reveal of my Falling quilt I showed you earlier this week! I knew from the beginning exactly how I wanted to quilt this one. Blowing wind swirling the leaves down to the ground. I'm still working on the execution but this was good practice. I have several ideas pinned on my FMQ board that I was aiming for. I think some drawing is in order before my next one.


The top half of the quilt worked just fine, doing the FMQ in a matching blue 40 wt Mettler thread. Juki was in a terrible mood for the lower half however and my thread broke at least 25 times At least. Plus one titanium needle busted into three pieces. Dang! But somehow we managed to get through it and once it was done it was great.

\

In my quest to do anything and everything to make the thread stop breaking, I ended up buying a few extra spools of thread. The one I used the most on the lower half was a variegated YLI in the perfect shades of orange and yellow. It looks UH-mazing on the back. So pretty! Speaking of the back - I found this gorgeous sheet at Ikea in Portland last month that I bought for the backing. It was in the as-is section (no packaging) so I'm not sure exactly what it is but it feels like a 600+ thread count sheet. It was just the right size to use for the backing and facing.


This is my first time doing facing (using this tutorial). I can't imagine this quilt with a binding, I think the facing is just right. Of course, I still have to sew it down to the back but for now a little Elmer's will hold it just fine. That's where the binding app comes in, right Seattle MQG? Maybe some elves will finish it for me in the middle of the night. A girl can dream...


I'm so happy to be done with this one and ready to wash and use it. I haven't decided just yet where it's home will be but I think these Oakshotts are begging to stay at my house at least for awhile. As this was my ALOYF goal for October, I'll be linking up over at the party at Fiber of All Sorts and Sew Bittersweet Designs.

Happy Halloween!
Allison

Thursday, October 30, 2014

Bloggers Quilt Festival


This is so exciting, now that I have a blog I can take part in fun events like the Bloggers Quilt Festival over at Amy's Creative Side. It's a virtual quilt show - all the beauty, none of the shipping costs or crowds. Woo!


I'm entering my very first medallion quilt, Metallion. I made it in April as part of a challenge for the Seattle MQG. We could make any quilt as long as it incorporated metallic fabric, thread, or something else. Side note - why is metallic fabric almost always gold? Silver is so much better! Anyhow, medallion quilt + metallic fabric led me to the name Metallion.


Anyhow, I used some metallics (RK Quilters Linen and TT Dreaming in Pearle) and lots of other fabrics to create this beauty. I started with Julie Hirt's Bowie pattern (free on her blog) for the center and built out from there. I knew I wanted to put certain elements in but I really just planned each border as I came to it. This little guy comes out to 40 x 40".


As much fun as I had making it, I had even MORE fun quilting it. The second time anyhow. Yep, I quilted it twice. I was originally going to spiral the whole thing and it turned out awful. The top kept spinning with the spiral until it was completely turned and the corners were not even on top of the batting and backing any longer. It was the worst!


So I unpicked it all and did what I should have done from the beginning. Some custom FMQ, totally different for each border and so much fun. Actually, this is making me think I should make some more medallion quilts so I can have this kind of fun again!


Thanks so much for looking, I hope you've enjoyed Metallion as much as I do.

Allison

Tuesday, October 28, 2014

Falling {for Oakshott}

Fall is my absolute favorite time of year. The air turns crisp. the leaves change colors, and it's acceptable to wear yoga pants and a hoodie all weekend. Here in the Seattle area, the scenery is gorgeous as usual and we've even had a bit of wind to make the colorful leaves sail through the air like it's a movie or something. I mean, how pretty are these trees?!


Almost as pretty as these gorgeous new Oakshott Autumn fabrics, I'd say.


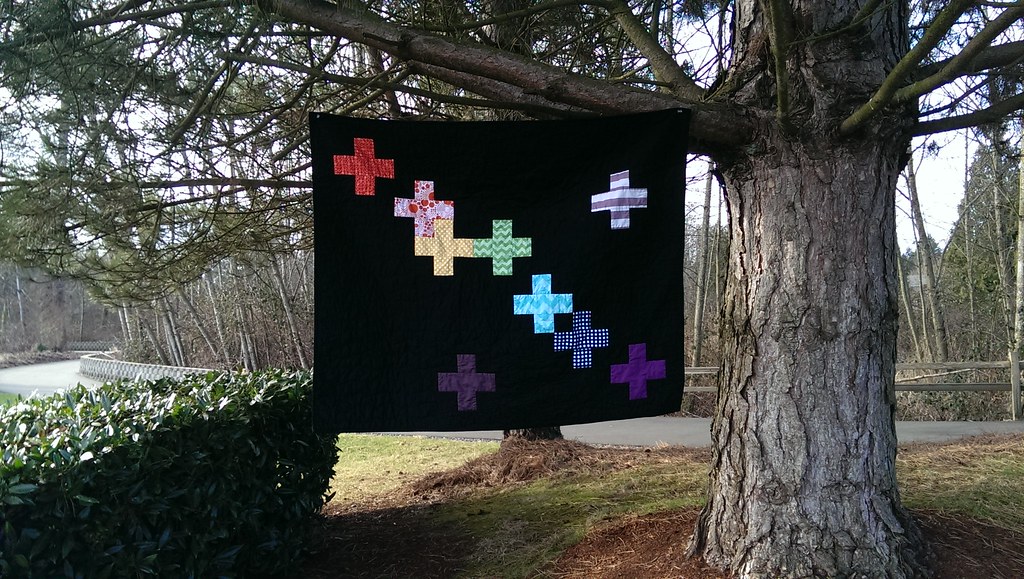
I was super excited to have the opportunity to work with these to create my own pattern. Of course, I thought of the colorful leaves falling to the ground and wanted to find a way to show that in a quilt. May I present Falling:


I absolutely LOVE how this turned out and it looks even better in person with the cross-woven fabric shimmering in the sunlight. Don't mind those extra edges that are sticking out in my picture above - those are trimmed off after quilting. Why trim more often than is necessary? This tutorial assumes you know how to piece 60 degree triangles so please do refresh your memory on that if needed. There are tons of great tutorials out there.

Want to make your own Falling quilt? You got it! Here are instructions to make your own 52" x 84" quilt. It's all based on 60 degree triangles. And just for the record, this could also be lovely as an intense sunset (Ruby Reds bundle with Colourshott 35 Linosa background) or a wintery scene (use the Lakes bundle with a Colourshott White Marble background, reverse the row numbers so the snow is falling!).

Fabric requirements:
Oakshott Autumn Fat Eighth bundle - I used all but 2 of the greens
2 meters background fabric - mine is Colourshott 18 Celebes
Backing


Cutting:
I starched my Autumn bundle before cutting to keep the bias edges from stretching out with the triangle piecing. If you're going to starch, definitely do it BEFORE you cut. You could get a little shrinkage with the starch and then you won't be happy. Don't ask me how I know this... All triangles are 60 degrees and were cut with the Hex n More ruler - it has a blunt tip on the top of the triangle. If you are not using a triangle ruler with the tip trimmed off, make sure you add an additional 1/4" to the triangle height. Diamond and half hexagon heights will not change.

Background fabric - referred to in directions as BG:
    (45) 6 1/2" tall triangles
    (45) 3 1/2" tall half hexagons (use the Hex n More or other hexagon ruler)
    (45) 3 1/2" tall diamonds
    (45) 3 1/2" tall triangles
The biggest triangles can be cut from 6 1/2" by WOF strips; the remainder should be cut from 3 1/2" by WOF strips. Go ahead and stack your strips to save cutting time. Save your scraps for the side edges of each row later.

Autumn bundle - referred to in directions as FALL:
    (90) 3 1/2" tall diamonds
    (450) 3 1/2" tall triangles
Cut 3 1/2" by WOF strips of each color you're using (I used 19 of the 21) and then stack them in sets of 3-5 for faster cutting. Cut 4-5 diamonds from each color and triangles from the rest of the strips. Save your scraps for the side edges of each row later.

To cut the diamonds, first cut 3 1/2" strips, then cut a 60 degree angle off one end by lining up the 60 degree line with the bottom edge of the strip.


Turn the strip the other way and line up the newly cut angle with the 3 1/2" line on your ruler. Cut. You now have a 60 degree diamond.


Piece Triangles:
You're going to make 6 different kinds of triangles. Think of each one as a big triangle made up of 4 smaller triangles. I've saved some of the piecing by cutting half hexagons (equal to 3 of the smaller triangles) and diamonds (equal to 2 of the smaller triangles). Make 45 of each of the different triangle types.


A: these are the 6 1/2" BG triangles
B: sew 1 FALL triangle to a BG half hexagon
C; sew 2 FALL triangles to a BG diamond


D: sew 1 FALL diamond to 1 FALL triangle and 1 BG small triangle
E*: sew 4 small FALL triangles together
F*: sew 2 small FALL triangles to 1 FALL diamond
* E and F are interchangeable - make more of one or the other if you like them better
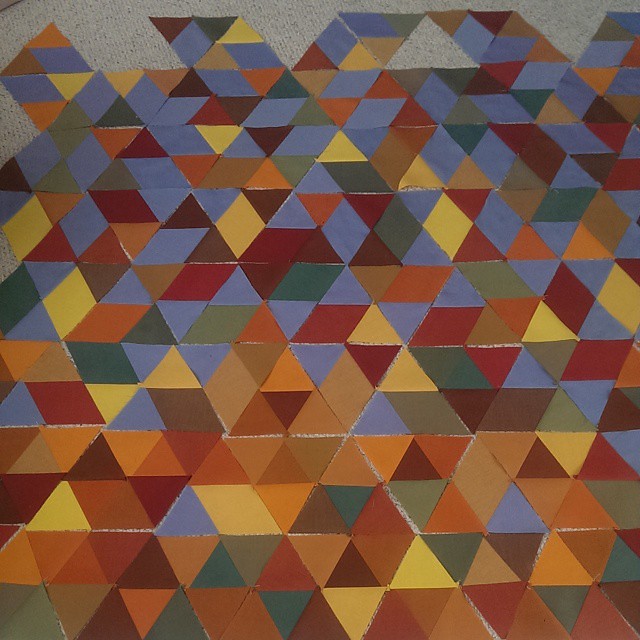
Piece Rows:
There are 14 rows in total. Use the indicated quantity of each triangle type, rearranging in a configuration you like. The floor makes a fantastic design wall if you don't have a real one.


Label each row with a piece of masking tape to keep them in order.


Row 1: 14 A triangles, 1 B triangle
Row 2: 13 A, 2 B
Row 3: 10 A, 5 B
Row 4: 8 A, 7 B
Row 5: 15 B
Row 6: 10 B, 5 C
Row 7: 5 B, 10 C
Row 8: 15 C
Row 9: 10 C, 5 D
Row 10: 5 C, 10 D
Row 11: 15 D
Row 12: 10 D, 5 E/F
Row 13: 5 D, 10 E/F
Row 14: 15 E/F

Using your leftover scraps from cutting, add a big half triangle to each end of each row. I pieced multiple FALL scraps to make the ends for the lower rows. If your half triangle is a little wider than it needs to be, it's fine. I leave those on until after quilting and just trim them off when I'm squaring up the quilt. Just make sure they are at least as wide as the outer point of that triangle.

And the quilt top is done! I always love the stained glass look of a quilt in the sun.


Baste and Quilt as Desired:
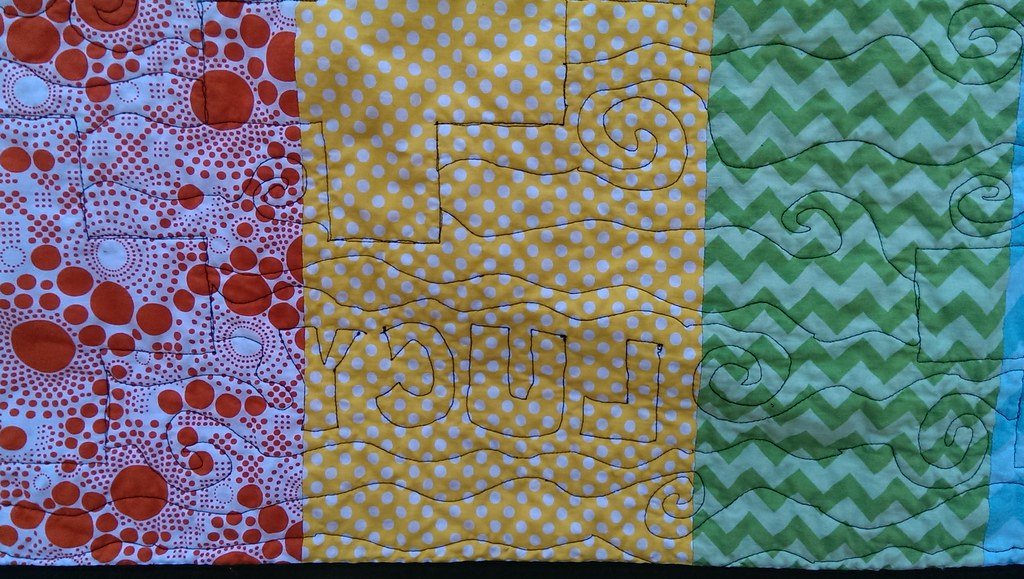
I'm lucky to have a big conference table at work that I can borrow for basting from time to time. I do have the quilting done on this but wasn't able to get good outdoor pictures of the final product just yet. Thanks a lot, Seattle weather! Be sure to check back Friday though and I'll show you all the details then. A teaser for now:


I hope to see you back here Friday for the rest! [Update: see finished quilt here.] In the meantime, be sure to check out the 6 other amazing bloggers on this tour. It's fun to see the wide variations we all came up with from the same bundle! Thanks so much to Lynne for hosting and the encouragement along the way!!

Grab the button below and follow along the blog hop:


21 October     Sonia Spence               fabricandflowersuk.blogspot.co.uk
22 October     Rossie Hutchinson        r0ssie.blogspot.com
24 October     Mary Menzer                 fairlymerry.blogspot.com
28 October     Alison Dutton                allison-sews.blogspot.com
29 October     Nicholas Ball                 quiltsfromtheattic.wordpress.com
30 October     Kati Spencer                 fromthebluechair.com
31 October     Wynn Tan                      zakkaArt.typepad.com

Wednesday, October 22, 2014

Purse Palooza


I'm excited to be guest posting over at Sew Sweetness today as part of Sara's Purse Palooza series. A whole month of bag pattern reviews with giveaways every day? Yes please!

Go check out my review of the Make It Perfect Mini Messenger and be sure to enter today's giveaway. Sew along with us - any bag or clutch you'd like - and link up by November 14th for a chance to win to even more awesome prizes.

See you over there!
Allison


Monday, October 20, 2014

A little bit of improv

I did something today that I don't normally do when sewing. I took out some scraps and cut with reckless abandon. No rulers, just eyeballing it. I have about a million projects and bee blocks that I'm in the middle of but I just wanted to do something a little different without any worries as to how it would turn out.


I watched Malka Dubrawsky's class on Creative Live a few weeks ago, 10 Ways to Love Improvisational Quilting. It was fun to watch along while Malka and the in-studio students happily sewed along. I came away with a lot of great ideas about putting blocks together in an improvisational way. My friend Sandi wrote a great review of the class over on her blog if you'd like to read more about it.


So back to today. I cut up some black and white squares and sewed up some half square triangles. They weren't exactly the same size and they were not perfectly square. It was fine. Still worked out. A la Malka, I added in some color strips and made them all fit together. It was freeing and fun. I might just start making more of these every now and then until I have enough for a big pillow. Maybe even a quilt. We'll see how that goes.

Linking up to Scraptastic Tuesday over at She Can Quilt.

Allison

Friday, October 17, 2014

Free Motion Friday: The Inbox Jaunt

Ever since discovering my love for free motion quilting, I've been on the lookout for FMQ styles I like. I've found quite a few but one of my faves is Lori Kennedy of The Inbox Jaunt. She creates the most awesome FMQ motifs and then shows her readers how to do each one with step by step photos. She even tells you what kind of fabric and thread she's used.

Lori makes it so easy to practice and learn her designs. Plus, she comes out with a new one each week! I've tried a few of them and really liked each one so far. Most recently I used her Perfect Pencil tutorial and it worked like a charm.

The Inbox Jaunt: The Perfect Pencil-A Free Motion Quilt Tutorial

My version of the pencils
A few other favorites:

The Inbox Jaunt: Double Loop Vine FMQ tutorial
I made a serger cover with Lori's Double Loop Vine motif

The Inbox Jaunt: Dragonfly FMQ tutorial

The Inbox Jaunt: Nora's Rose FMQ tutorial

These are just a few of the TONS she has on her site. Definitely check her out if you have not already!

Allison

Monday, October 13, 2014

Design Surface Patterns from Scratch


Welcome to my stop on the Design Surface Patterns from Scratch blog tour. I hope you also checked out Heidi at Lost In Reverie yesterday. Two months ago I came across a promo for Bonnie Christine's class on Creative Live, Design Surface Patterns from Scratch. Bonnie is a designer for Art Gallery Fabrics and has come out with some beautiful collections. I had never really given much thought to surface pattern design but I liked Bonnie's work and the class sounded interesting so I followed along for the three day class.


Wow, did I learn a lot! She was kind enough to start with the basics for people like me who had never even looked at Adobe Illustrator. From there she went on to reveal all of her secrets and her entire design process. It was a wonderful look into her world.

Practicing making a color palette from a picture.

I did end up signing up for the 30 day free trial of Illustrator on Creative Cloud and I'm practicing some things while I have that trial time. I'm not sure yet if I'll keep up my subscription afterward though as it's not especially cheap for something I may not use very much. What happened to just being able to buy the software and then you own it? That would make things much easier.

Making a butterfly along with Bonnie - that's the class video in the lower right corner.

I'm hoping to have a blog header and all kinds of other fun goodies designed before my 30 days are up. While I learn, I'm having fun following along again with Bonnie's class. If you've ever thought about designing fabric or other surface patterns, I would highly encourage you to buy this class. Rewatching little bits at a time and being able to pause and rewind has been very helpful. And she covers so much - you will definitely get your money's worth.

As part of this blog tour, Bonnie has offered my readers a free one month membership to the Roost Tribe, a special section of her website where she shares exclusive content, resources, and discounts. Just click here to sign up for your free month. For now, I'll leave you with a color palette I made from a photo I took at a recent trip to the aquarium. I just love all those colorful sea anemones! Be sure to visit Susan at Designs of Home tomorrow for the next stop on the tour.

Allison

Friday, October 10, 2014

Free Motion Friday: A Rainbow of Plusses for Lucy


Last winter, we had a challenge with the Modern Quilt Guild to create something with the featured Riley Blake fabrics. I decided I'd add a few more colors and round that stack out to a full rainbow for my little niece. Black seemed like a fun background color but it does collect and show tons of lint.


I traced around each plus with FMQ and then just did some loose waves and a few spirals in the background. I need to work on this design a little more to make is look more like I want it to. One last detail was quilting her name in outlined letters but I now wish I had written it backwards as it's much more visible on the back of the quilt.


Allison

Monday, October 6, 2014

Ocean Current


I belong to a charity bee on Flickr called do. Good Stitches. It's a wonderful (and huge) group of quilters that makes quilts for various charities. We are split up into circles of 10 to make things more manageable. My circle, Believe, makes quilts for foster kids that we send to My Very Own Blanket in Ohio. I love this cause!


Each group has stitchers who sew 2 blocks per month, and quilters who put those blocks together and do the actual quilting. I was a quilter for awhile and this is one of the quilts I made. The quilter also gets to pick out the design and color palette so of course I went with blues! My stash is overflowing with blues.


I wasn't sure exactly how I was going to put the blocks together but I knew the half square triangles would give me a lot to work with. I put them on the design wall and just kept moving them around until I had a few layouts I liked. In the end, I really love how this one came together.


The quilting was a lot of fun on this one! I wanted it to be dense to withstand a lot of washing and I wanted to have some fun with free motion quilting. I decided on thin figure 8s for the blue lines and a boxy stipple in the white lines. I was able to get the whole thing done on my Juki in just a few hours! Oh how I love my Juki!


As I was finishing this one up, a terrible landslide tragedy struck very close to home. The Oso landslide killed 43 people and buried 49 homes in Oso, Washington all in a matter of seconds. It took weeks to find all of the victims as the mud and debris were over 100 ft deep in some places. My dad's house is just 10 miles away from this on that same road so it was pretty scary for me. I talked to my Believe circle and they agreed to let me send this quilt to the Oso victims and first responders instead. I hope it's bringing comfort and joy to whomever has it now!


Allison

PS - since it's the beginning of the month, it's goal time! I'm going to finish my Oakshott Autumn quilt this month. Promise!


Related Posts Plugin for WordPress, Blogger...